How to Design a Stimulus-Based Interview Study: From Image Selection to Analysis
Showing participants something concrete — a packaging concept, a product mockup, a brand visual — fundamentally changes the quality of interview data you collect. Instead of abstract opinions, you get grounded reactions. Instead of hypothetical preferences, you get visceral responses tied to real artifacts.
But a poorly designed stimulus study can do more harm than no stimulus at all. Bad image quality biases reactions. Wrong presentation order skews preferences. Missing descriptions confuse AI moderators. And without a deliberate analysis framework, you end up with a pile of reactions you cannot compare.
This guide walks through the complete workflow for designing a stimulus-based interview study, from the moment you define your research objectives to the final stakeholder presentation. Every step includes practical decisions, common mistakes, and specific guidance for running these studies with AI-moderated interviews on Qualz.ai.
Whether you are testing packaging concepts, evaluating brand visuals, or exploring reactions to product prototypes, this workflow will help you design a study that produces clean, comparable, actionable data.
Step 1: Define Research Objectives That Stimulus Can Actually Answer
Not every research question benefits from stimulus materials. Before you prepare a single image, get clear on what stimulus can and cannot do for your study.
Stimulus works well for:
- Concept preference and comparison ("Which of these three packaging designs communicates premium quality?")
- Emotional and visceral reaction capture ("What is your first impression when you see this?")
- Feature identification and salience ("What stands out to you? What do you notice first?")
- Communication testing ("What does this design say to you about the brand?")
- Usability first impressions ("Where would you tap to find pricing?")
Stimulus works poorly for:
- Deep attitudinal exploration where visuals distract from the underlying belief system
- Behavioral recall studies where you need participants to describe past experiences without anchoring
- Sensitive topics where showing images could prime socially desirable responses
Match stimulus type to research goal. If you are testing whether a concept communicates a specific value proposition, you need polished enough stimulus to represent the concept fairly. If you are exploring early-stage creative directions, rough sketches prevent participants from reacting to execution quality rather than the underlying idea.
Write your research objectives before touching any image files. Each objective should map to a specific type of stimulus interaction: single-concept evaluation, side-by-side comparison, or sequential reveal.
For a deeper look at matching study goals to interview formats, see our guide on how to design interviews for your research.
Step 2: Select Stimulus Type and Fidelity Level
The fidelity of your stimulus — how polished and production-ready it looks — directly shapes the type of feedback you receive. This is one of the most consequential decisions in study design, and researchers get it wrong constantly.
The fidelity trap: When you show a participant a high-fidelity, beautifully rendered concept, they evaluate execution. They comment on color accuracy, font choices, shadow effects. When you show a low-fidelity sketch or wireframe, they evaluate the idea. They talk about whether the concept resonates, whether it solves a problem, whether it communicates value.
Use low fidelity when:
- You are in early exploration and need to evaluate concepts, not executions
- You have many concepts (5+) and need fast directional feedback
- You want participants to project their own mental models onto the stimulus
- Budget or timeline does not allow for polished renders
Use high fidelity when:
- You are in final validation before production
- The research question specifically involves visual execution quality
- You are testing shelf presence, where realistic rendering matters
- Stakeholders need to see realistic stimulus to trust the findings
Use mixed fidelity cautiously. Showing one polished concept alongside three rough sketches guarantees the polished one wins on first impression. If you must mix fidelity levels, acknowledge this explicitly in your analysis and flag it to stakeholders.
Common stimulus types for interview studies:
- Product packaging renders (front, back, shelf context)
- App or website screenshots and wireframes
- Brand identity elements (logos, color palettes, taglines)
- Advertising creative (storyboards, print concepts, social media mockups)
- Physical product photos or 3D renders
- Service journey maps or process diagrams
Step 3: Prepare Images for Consistent, Unbiased Presentation
Image preparation is where most stimulus studies introduce unintentional bias. A concept shown on a white background with sharp lighting looks more "professional" than one on a gray background with soft focus — regardless of the actual concept quality.
Resolution and sizing:
- Use consistent resolution across all stimulus images. If one image is 1200x800 and another is 600x400, the higher-resolution image reads as more credible.
- Aim for at least 1200px on the longest edge for clear display across devices.
- Use the same aspect ratio for comparable stimulus. Portrait-to-landscape switches disrupt visual comparison.
Backgrounds and context:
- Use identical backgrounds for all concepts in a comparison set. White or neutral gray works for most product shots.
- If context matters (shelf placement, in-use scenarios), provide it consistently for every concept.
- Remove watermarks, draft labels, or version numbers that signal internal status. Participants should not know which concept your team favors.
File formats:
- PNG for graphics, illustrations, or anything with text (lossless compression preserves readability)
- JPEG/WebP for photographs (good compression, fast loading)
- Avoid PDFs or multi-page documents — use single images per stimulus
Removing bias from visual presentation:
- Crop all images to the same framing and scale
- Apply consistent color correction if mixing images from different sources
- Remove brand names from concepts if you want to test the design independent of brand equity
- Number or label concepts neutrally ("Concept A, B, C" not "New Design, Current Design, Budget Option")
In Qualz.ai, you can use the comparison image creator to prepare matched stimulus sets. It enforces consistent sizing and layout, so you do not accidentally introduce visual hierarchy through image dimensions alone. You can also set up thumbnail navigation so the AI moderator presents each concept in a controlled sequence rather than dumping all images at once.
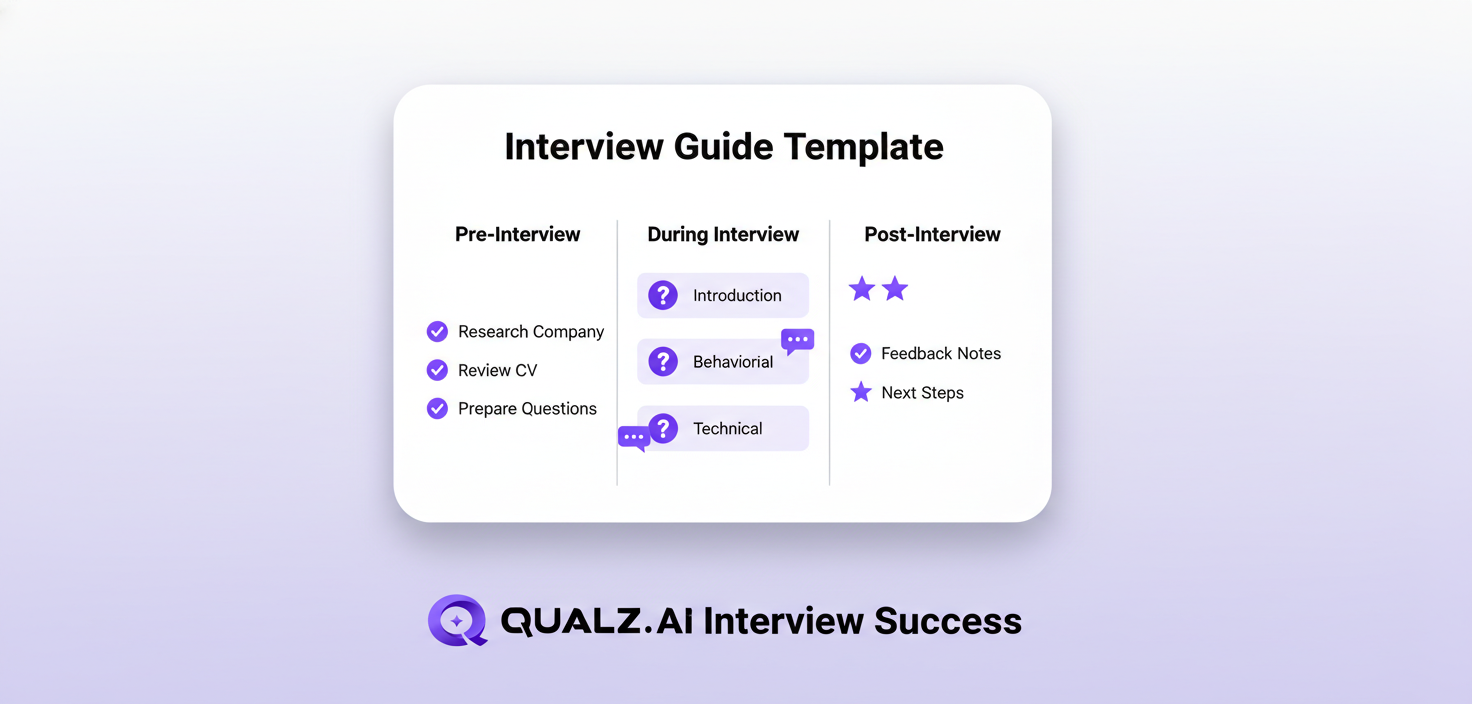
Step 4: Structure the Interview Guide Around Stimulus
The interview guide is the backbone of your stimulus study. A poorly structured guide wastes stimulus by showing images at the wrong moment, in the wrong order, or without adequate setup.
The four-phase structure for stimulus interviews:
Phase 1: Warm-up (no stimulus). Start with 2-3 questions that establish context without showing any images. This grounds the participant in the topic, surfaces their existing mental models, and gives you baseline language before stimulus influences their vocabulary.
Example: "Tell me about the last time you purchased [category]. What was that experience like? What mattered most in your decision?"
Phase 2: Single concept evaluation. Show one concept at a time. Let the participant react, explore, and articulate their response before introducing comparison dynamics. This phase captures unanchored first impressions.
Example: "I am going to show you a concept. Take a moment to look at it, then tell me your initial reaction."
Phase 3: Comparative evaluation. After evaluating concepts individually, bring them together for direct comparison. This is where preference data emerges, but it only works if Phase 2 captured genuine individual reactions first.
Example: "Now that you have seen all three concepts, which one best communicates [target attribute]? Why?"
Phase 4: Synthesis and preference. Close with open-ended reflection. Let the participant integrate everything they have seen and articulate their overall perspective.
Example: "If you could take elements from any of these concepts to create your ideal version, what would you keep and what would you change?"
Why order matters: Showing comparison sets before individual evaluation anchors responses. The participant cannot un-see the alternatives. Phase 2 data becomes contaminated because their "individual" reaction is actually a comparative reaction. Always evaluate individually first, then compare.
For more on structuring interviews effectively, read our guide on how to design interviews for your research.
Step 5: Write Stimulus Descriptions That Coach the AI Moderator
In AI-moderated interviews, the moderator cannot "see" your stimulus images the way a human moderator can. It relies on the descriptions you provide to understand what the participant is looking at and to ask relevant follow-up questions. Poor descriptions produce generic probing. Rich descriptions produce sharp, contextual follow-ups.
What a bad stimulus description looks like:
"Product packaging design option 1."
This tells the AI moderator nothing. It cannot ask about specific elements, colors, layout choices, or messaging because it does not know what those are.
What a good stimulus description looks like:
"A premium coffee packaging concept featuring a matte black bag with gold foil lettering. The brand name 'Elevate' is centered in a serif font. Below the brand name is the tagline 'Single Origin, Small Batch.' The bag includes a small illustration of a mountain landscape in gold line art. The overall aesthetic targets affluent consumers aged 30-50 who value craft and origin story."
Now the AI moderator can ask: "What does the gold foil communicate to you?" or "How does the mountain illustration affect your perception of the brand?" or "Does the tagline 'Single Origin, Small Batch' align with what you see in the design?"
Description coaching principles:
- Describe visual elements specifically (colors, fonts, layout, imagery)
- Include the intended message or positioning so the moderator can test whether it lands
- Note anything the participant might find confusing or ambiguous
- Mention the target audience so the moderator can contextualize reactions
- Keep descriptions under 200 words — enough context without overwhelming the moderator
In Qualz.ai, you write these descriptions directly in the stimulus configuration panel. The platform uses description coaching to help you write descriptions that give the AI moderator enough context to probe effectively. Think of it as briefing a human moderator — the more context you provide, the better the conversation.
For a comprehensive look at how stimulus images work in AI-moderated interviews, see our stimulus images in interviews documentation.
Step 6: Choose the Right Interview Mode
The interview mode determines how tightly the AI moderator follows your guide versus how freely it explores emergent topics. For stimulus studies, this choice directly affects data comparability.
Structured mode — for controlled comparison studies:
Use structured mode when you need clean, comparable data across participants. The AI moderator follows your guide closely, shows stimulus in the prescribed order, and asks the same core questions to everyone. This produces data you can systematically code and compare.
Best for: Final concept validation, A/B preference testing, quantifiable concept scoring.
Semi-structured mode — for exploratory concept testing:
Use semi-structured mode when you want the benefits of stimulus but also want the AI moderator to follow interesting threads. The moderator covers your core questions but has latitude to probe deeper when a participant says something unexpected.
Best for: Early-stage concept exploration, understanding emotional reactions, discovering unanticipated associations.
Unstructured mode — for deep-dive creative exploration:
Use unstructured mode when the stimulus is a conversation starter rather than the conversation itself. The moderator uses images as prompts but lets the participant drive the direction. This produces rich, divergent data that is harder to compare but reveals unexpected insights.
Best for: Creative ideation sessions, brand perception deep dives, exploratory research where you do not yet know what questions to ask.
For a detailed comparison of these modes and when to use each one, see understanding interview types.
The trade-off is always comparability vs. depth. Structured gives you clean comparison at the cost of missing unexpected insights. Unstructured gives you depth at the cost of messy cross-participant analysis. Semi-structured is the pragmatic middle ground for most stimulus studies.
Step 7: Manage Order Effects and First-Shown Bias
First-shown bias is real, well-documented, and will contaminate your data if you ignore it. The first stimulus a participant sees benefits from novelty and full attention. By the third or fourth concept, fatigue sets in, and participants give shorter, less engaged responses.
Counterbalancing strategies:
- Full rotation: Each participant sees concepts in a different order. With 3 concepts and enough participants, every concept appears equally in every position.
- Latin square design: A systematic rotation that ensures each concept appears in each position exactly once across a set of participants. More efficient than full random permutation.
- Randomization: Let the platform randomly order stimulus for each participant. Simpler to implement but requires enough participants for positions to balance out statistically.
Practical counterbalancing for AI interviews:
In Qualz.ai, you can configure stimulus presentation order at the study level. The platform supports randomized ordering so that across your participant pool, each concept gets fair representation in each position. Combined with the AI moderator auto-show/hide feature, you control exactly when each stimulus appears and disappears during the conversation flow.
Additional tactics for managing order effects:
- Use a "palette cleanser" question between concepts: "Before I show you the next concept, tell me about a time when..."
- Keep stimulus sets small. Three concepts is the sweet spot. Five is the maximum before fatigue seriously degrades data quality.
- If you must show more than five concepts, split into rounds with a break or topic change between them.
- Always analyze position effects in your data. If Concept C consistently scores lower and was always shown third, you have an order problem, not a concept problem.
Step 8: Pilot Test Before Going Live
Piloting a stimulus study is not optional. It is the difference between clean data and a wasted research budget. In stimulus studies specifically, piloting catches problems that are invisible in guide review: images that do not render, descriptions that confuse the moderator, timing that feels rushed, and transitions that feel jarring.
What to check in a pilot:
- Image rendering: Do all stimulus images display correctly? Are they the right size? Do they load fast enough that the conversation does not stall?
- Description accuracy: Does the AI moderator reference stimulus elements correctly? Does it ask follow-up questions that make sense given what the participant is seeing?
- Timing and pacing: Is there enough time between stimulus presentations for genuine reflection? Does the interview feel rushed when stimulus is included?
- Transition quality: Do the transitions between warm-up, individual evaluation, and comparison phases feel natural?
- Order implementation: Does randomization work correctly? Are concepts actually appearing in different orders?
Using AI participants for piloting:
One of the most efficient ways to pilot a stimulus study is to run it with AI participants first. In Qualz.ai, AI participants simulate realistic interview responses, allowing you to verify that stimulus appears correctly, the AI moderator references images naturally, and the overall flow works before you spend budget on real participants.
Run at least 3-5 AI participant sessions with different stimulus orders. Review the transcripts for:
- Moments where the moderator seems confused about what the participant is seeing
- Generic probing that suggests the description is not detailed enough
- Awkward transitions between stimulus presentations
- Questions that do not make sense in the context of the shown image
Fix these issues before launching. A 30-minute investment in piloting saves hours of unusable data cleanup later.
For more on the broader topic of stimulus in qualitative research, see our stimulus-based qualitative research guide.
Step 9: Analyze Stimulus-Prompted Data
Analyzing stimulus study data requires a framework that connects participant responses to specific visual elements. Generic thematic analysis misses the point — you need to know which concept triggered which reaction and why.
Coding visual reactions:
Create codes that tie directly to stimulus elements:
- Element-specific reactions: "Responded positively to gold foil," "Confused by tagline placement," "Did not notice mountain illustration"
- Emotional responses: "Expressed excitement at first sight," "Showed hesitation," "Described feeling of trust"
- Comparative language: "Preferred A over B because of color," "Said C felt cheaper than A"
- Unprompted mentions: Track what participants notice without being asked — these are the highest-signal data points
Comparing across concepts:
Build a concept-by-concept matrix:
| Dimension | Concept A | Concept B | Concept C |
|---|---|---|---|
| First impression | Premium, sophisticated | Modern, playful | Confusing, cluttered |
| Key element noticed | Gold foil lettering | Bold color gradient | Too many elements competing |
| Emotional tone | Trust, aspiration | Energy, fun | Overwhelm, uncertainty |
| Purchase intent signal | Strong for gift-giving | Strong for personal use | Weak across contexts |
Identifying themes across the study:
Look for patterns that transcend individual concepts:
- Are participants consistently drawn to specific visual elements across all concepts?
- Do certain design principles (minimalism, bold color, illustration style) consistently outperform others?
- Are there participant segments that respond differently to the same stimulus?
Using transcript evidence:
Every claim in your analysis should link back to a specific participant quote tied to a specific stimulus. "Participants preferred Concept A" is weak. "7 of 10 participants described Concept A as 'premium' or 'high-end' upon first viewing, with 4 specifically citing the gold foil as the reason" is actionable.
In Qualz.ai, transcripts include markers for when stimulus was shown and hidden, making it straightforward to connect responses to specific images during analysis.
Step 10: Report and Present Stimulus-Based Findings
Stimulus-based findings have a natural advantage in stakeholder presentations: you can show the actual concepts alongside the data. Use this. A finding accompanied by the stimulus image and a participant quote is 10x more persuasive than a bullet point on a slide.
Structuring the findings presentation:
Start with the decision. Lead with the answer to the research question. "Concept A is the strongest candidate for launch, with two specific modifications." Then support it.
Show the stimulus. Embed the actual concept images in your presentation. Stakeholders need to see what participants saw. Do not describe the concepts — show them.
Layer in evidence. For each finding, pair the concept image with:
- The key participant quotes that support the finding
- The quantitative summary (how many participants, what percentage)
- The specific visual elements that drove the reaction
Address the nuances. Where did concepts perform differently across segments? What elements from weaker concepts could strengthen the winner? What surprised you?
Include the methodology note. Briefly describe your study design: number of participants, interview mode, counterbalancing approach, and stimulus fidelity. This builds credibility and helps stakeholders contextualize the findings.
Practical tips for embedding visuals in deliverables:
- Use side-by-side layouts: concept image on the left, key findings on the right
- Include annotated versions of stimulus images showing which elements participants responded to
- Create a "concept scorecard" that visually summarizes performance across dimensions
- For concept testing specifically, see our detailed guide on concept testing with AI interviews
The stakeholder golden rule: Make it impossible for someone who missed the presentation to misinterpret the findings. Every slide should stand alone with the stimulus visible, the finding stated clearly, and the evidence directly below.
Bringing It All Together
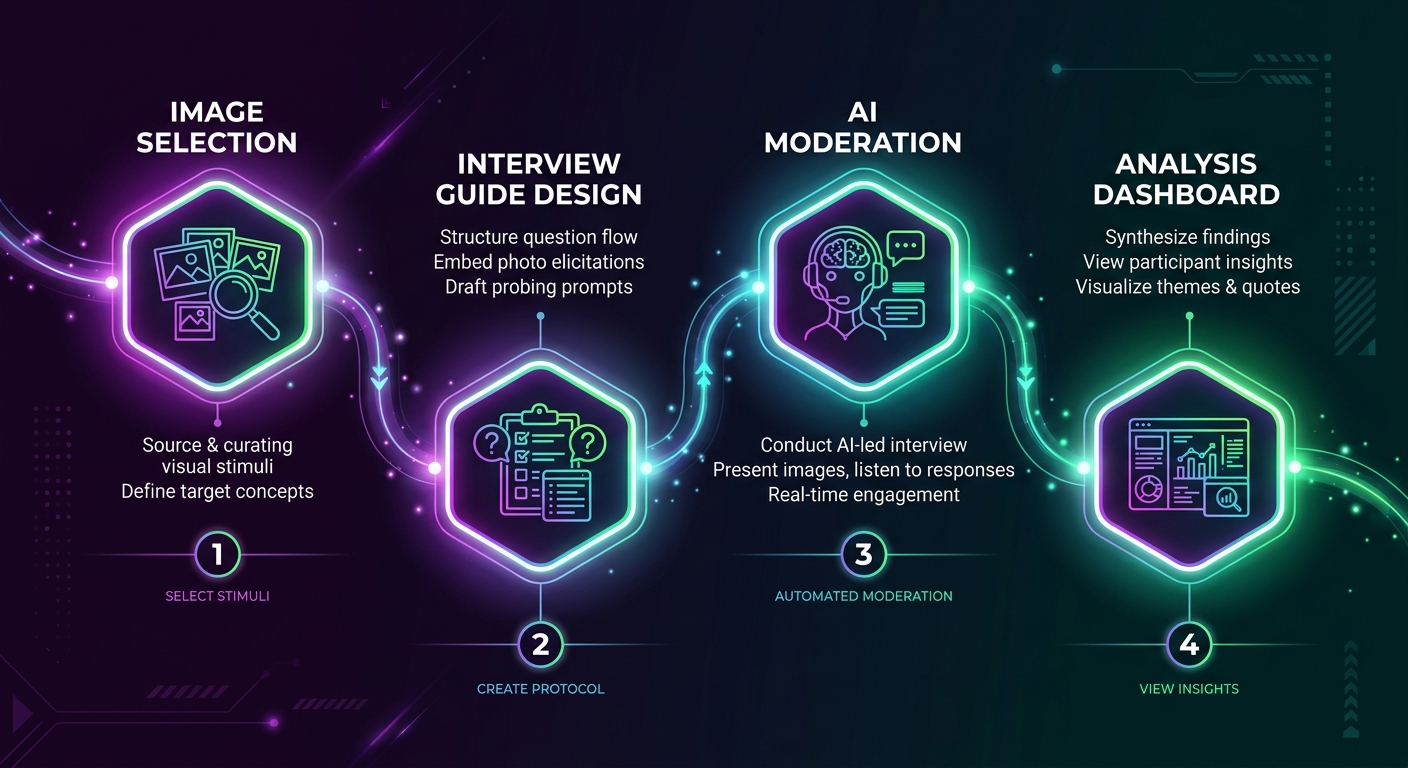
Designing a stimulus-based interview study is a 10-step workflow where each step builds on the previous one:
- Define objectives that stimulus can actually answer
- Choose the right fidelity level for your research stage
- Prepare images with consistency and bias removal
- Structure the guide around a warm-up, individual evaluation, comparison, and synthesis flow
- Write rich stimulus descriptions that coach the AI moderator
- Select the interview mode that matches your comparability vs. depth needs
- Implement counterbalancing to neutralize order effects
- Pilot with AI participants before spending budget on real ones
- Analyze with element-specific coding tied to individual concepts
- Present findings with stimulus images embedded alongside evidence
Each step has a clear output that feeds into the next. Skip any step and you introduce noise that compounds through the rest of the workflow.
The good news: platforms like Qualz.ai are purpose-built for this workflow. From the comparison image creator that enforces visual consistency, to description coaching that helps your AI moderator probe effectively, to AI participants that let you pilot cheaply — the tooling exists to execute this workflow efficiently.
The research question you are trying to answer deserves stimulus that is prepared deliberately, presented fairly, and analyzed rigorously. This workflow gets you there.
Ready to design your first stimulus-based interview study? Book a demo with our team to see how Qualz.ai handles stimulus presentation, AI moderation, and analysis in a single platform.